At SiteTran, we’ve had the privilege of supporting a vast range of companies as they build, refine, and grow their websites. Through this experience, we've gathered valuable insights into what makes a successful website, the tools that simplify the process, and the common hurdles that can trip up even the most determined site builders. Whether it’s watching new ventures flourish online or learning from missteps along the way, we've seen it all—and we're here to share that knowledge with you.
If you're ready to create your very first website, you've come to the right place. Whether you're a tech-savvy pro or someone who isn’t quite sure what “HTML” stands for, this guide is designed to make your journey not just manageable, but enjoyable. We’ll skip the intimidating technical talk and instead walk you through each step strategically. By the time we’re done, you’ll have the confidence and know-how to start building a website that reflects your vision without feeling lost or overwhelmed.
Let’s jump in!
1. First Things First: What Do You Really Want?
Before you start building, you need a clear vision. This means understanding the fundamental purpose of your website. Is it to showcase your portfolio, drive e-commerce sales, or act as a blog filled with informative content? Getting clarity on your goals will help inform the design and content choices you make.
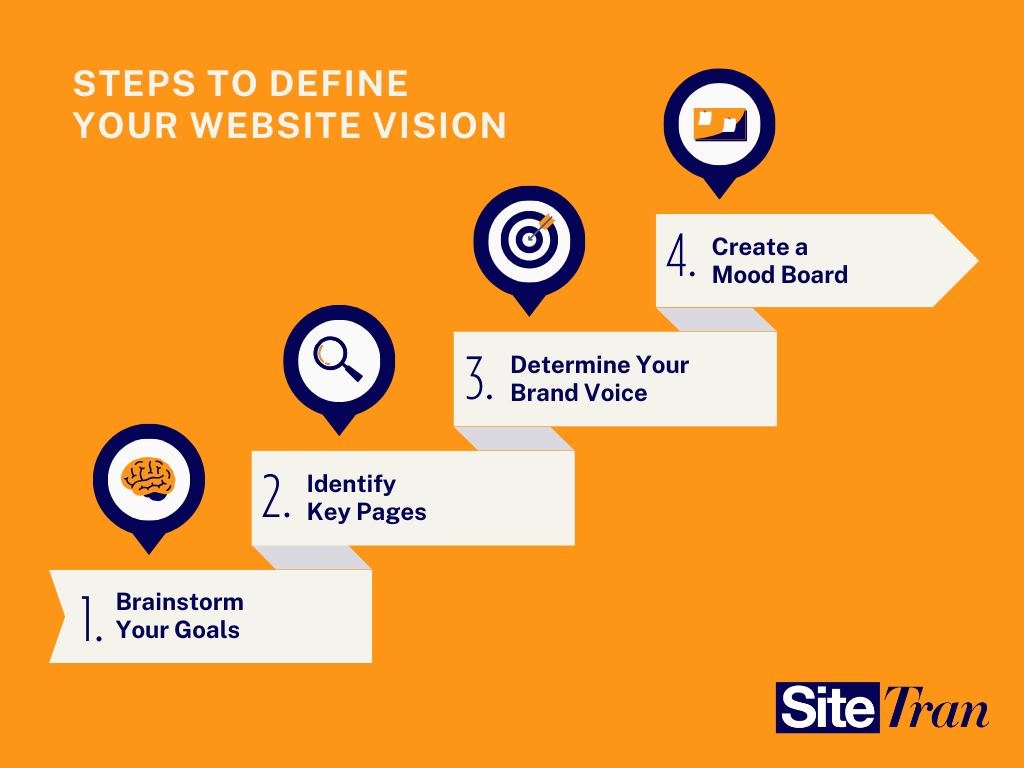
Steps to Define Your Website Vision:
- Brainstorm Your Goals: Write down what you hope to achieve with your site. This could range from “showcase photography work” to “generate leads for my marketing agency.”
- Identify Key Pages: Knowing you need a homepage, about page, contact page, etc., helps organize your vision.
- Determine Your Brand Voice: Should your site feel professional and sleek or casual and friendly? Define this early for consistency.
- Create a Mood Board: Use tools like Pinterest or Milanote to collect images, color schemes, and design ideas that align with your vision. This visual aid can help solidify your creative direction.
Why It Matters: Your website’s purpose will shape how you build each part. For example, an online store should prioritize product displays and an easy checkout process, while a blog may focus on readability and search engine optimization (SEO).
Practical Tip: Try sketching out a flowchart of how users might navigate your site. Understanding the user journey helps ensure that your design serves its purpose.
2. Finding Your Muse: What Inspires You?
Before designing, finding inspiration can fuel your creativity and give you a strong sense of direction. Here’s how to gather ideas:
Where to Look for Inspiration:
- Competitor Analysis: Visit the top websites in your industry. Take notes on what you like and what could be improved. Look at design, user flow, and interactive elements.
- Explore Different Industries: Sometimes the best ideas come from unrelated fields. If you’re creating a website for a law firm, visiting an artist’s portfolio site might inspire you to include unique visual storytelling elements.
- Use Design Galleries: Websites like Awwwards, Dribbble, and Behance showcase cutting-edge design trends and innovative website concepts.
How to Organize Your Inspiration:
- Create an Inspiration Folder: Use apps like Notion, Evernote, or a simple cloud folder to save screenshots, URLs, or PDF clippings of web pages that catch your eye.
- Take Notes on Specific Elements: Identify what makes a particular site stand out. Is it the minimalist navigation, the color palette, or the use of negative space? Document these observations for future reference.
Pro Tip: Avoid directly copying what you see. Instead, use these ideas as a springboard to create a unique site that fits your brand.
3. Writing It Down: Your Best Friend in Website Planning
The planning phase sets the stage for everything that comes next. Here’s how to make this process effective:
How to Start Your Planning Document:
- Choose Your Tool: Whether it’s Google Docs, Microsoft Word, or a dedicated planning tool like Milanote, pick a platform you find easy to use.
- Start with a Brain Dump: Write down everything that comes to mind about your website. Don’t worry about order or logic yet. This can include ideas for headlines, calls to action (CTAs), page names, and feature lists.
- Categorize Your Notes: Once you have a good amount of content, start organizing it into categories such as “Homepage Ideas,” “Services Page Content,” and “Contact Page Details.”
- Involve Your Team: If you’re collaborating, consider setting up a shared document where everyone can add thoughts and feedback.
Why Documentation Helps: Planning content and ideas in advance makes it easier to align your website’s structure with your goals. It also ensures consistency in your messaging and branding throughout the site.
Pro Tip: Keep this document handy during the building process for quick reference.
4. Preliminary Prep: The Basics
Preparation is key before diving into design and development. Here’s how to make sure you have everything you need:
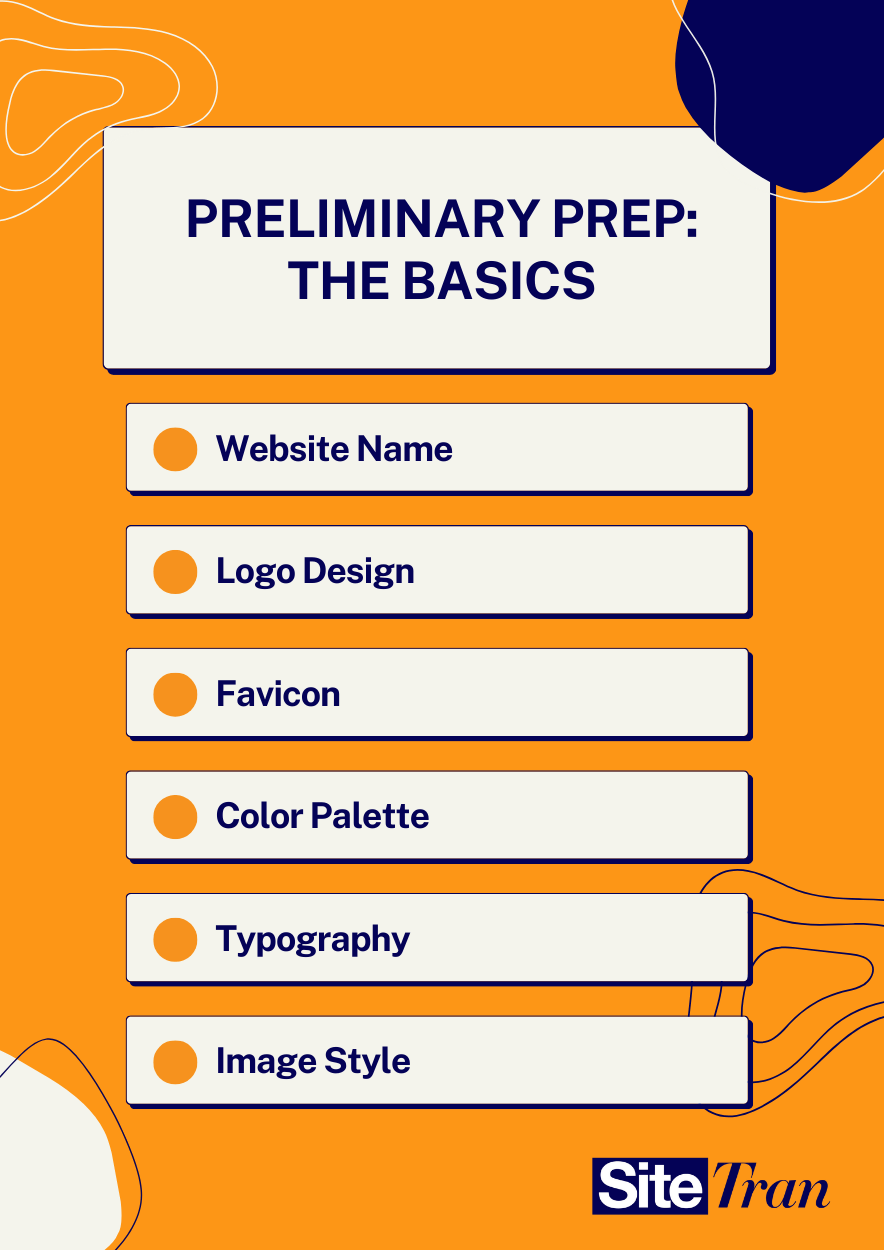
Key Preparatory Elements:
- Website Name: This is your digital identity. Make sure it’s unique, easy to remember, and relevant to your content.
- Logo Design: Your logo is often the first visual element visitors will recognize. If you don’t have one, use tools like Canva for a simple DIY approach or hire a graphic designer for a professional touch.
- Favicon: This tiny image appears in the browser tab and adds professionalism to your site. It’s usually a simplified version of your logo or an icon that represents your brand.
Basic Visual Assets:
- Color Palette: Decide on brand colors that evoke the right emotions and align with your content.
- Typography: Choose fonts that are legible and align with your brand voice. Consider pairing fonts for headings and body text for a cohesive look.
- Image Style: Whether you’re using stock images or custom photos, maintain a consistent style across all pages.
Further Reading: For logo and branding inspiration, visit Canva’s Design School.
5. What Should Be on the Website?
It's time to map out how your website's content will be organized—deciding where the pieces should go and how sections should be divided.
Here’s some ideas to help think critically about what you’re building:
Break Down Your Goals Page-by-Page:
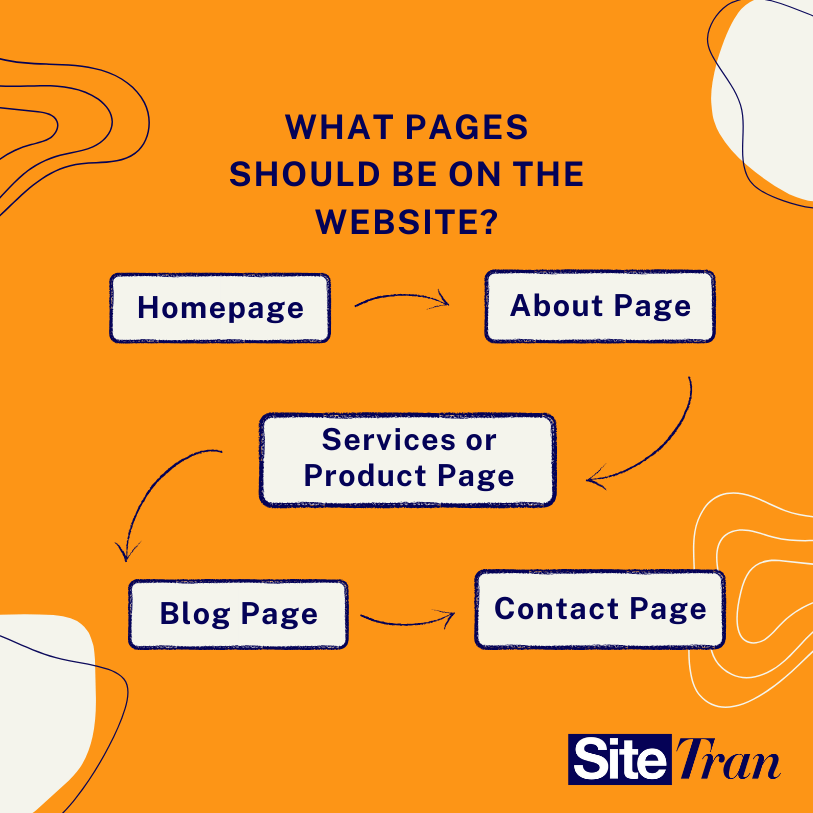
- Homepage: Should be inviting and clear about what your website offers. Include a strong headline, brief summary, and CTA.
- About Page: Tell your story. What sets you apart from the competition? Use this space to establish trust with visitors.
- Services or Product Page: Highlight what you offer with clear descriptions and high-quality images.
- Blog Page: If applicable, consider an engaging layout that makes articles easy to find and read.
- Contact Page: Ensure visitors know how to reach you. Include a form, contact details, and social media links.
Essential Questions to Ask:
- Who is my target audience?
- What do I want visitors to do on each page?
- How can I make each section easy to navigate?
Example Strategy:
For an online portfolio, each page could include:
- Homepage: Introduction and featured projects.
- About Page: Bio and career highlights.
- Portfolio: A gallery of your work with descriptions.
- Contact Page: Email form and links to professional networks.
6. Wireframing: The Blueprint of Your Site
Wireframing is an essential step that serves as a roadmap for your design and content placement. Here’s an overview:
What Is a Wireframe?
A wireframe is a visual guide that represents the skeletal framework of a website. Think of it as a blueprint that outlines where elements like images, text, and buttons will go. Wireframes help ensure your content flows logically and fits into the overall design.
Why Wireframing Is Important:
- Saves Time: A wireframe helps you identify design problems early, avoiding major revisions later.
- Improves Communication: If you’re working with a team, wireframes provide a clear visual to discuss layout ideas.
- Guides Content Creation: It’s easier to write content when you know where it will appear on the page.
Tools for Wireframing:
- Pen and Paper: Great for quick sketches and brainstorming.
- Figma: A free, web-based design tool perfect for creating wireframes and prototypes.
- Sketch: Ideal for macOS users looking for more advanced wireframing capabilities.
- Adobe XD: Excellent for wireframes, prototyping, and collaboration.
Basic Tutorial to Create a Wireframe:
- Start with the Homepage: Draw a simple box for the header, followed by sections for text, images, and buttons.
- Label Your Sections: Clearly indicate where elements like the navigation bar, hero image, and footer will go.
- Focus on Function, Not Design: This is not the time to add color or fine details. Concentrate on layout and structure.
- Iterate and Get Feedback: Show your wireframe to colleagues or friends for feedback.
Example: Sketch out a sample wireframe of a simple landing page, showing where a headline, image, and CTA button would go.
Link to Further Learning: Visit Figma's official documentation for tutorials and best practices.
Did you know? According to WebFX, 94% of users consider website design a crucial factor in forming their first impressions of a site.
7. Picking Your CMS: Where the Magic Happens
Choosing a Content Management System (CMS) is one of the most crucial decisions when building your first website. Your CMS determines how easily you can create, manage, and publish content. Let’s dive into what a CMS is, why you need one, and which options are best for beginners and more advanced users.
What Is a CMS?
A CMS is a software platform that allows users to create and manage digital content without needing to write code from scratch. It acts as an interface between your website’s content and its backend, making it easier to edit text, upload images, and organize pages.
Why Use a CMS?
- User-Friendly: Most CMS platforms are designed to be easy to use, even for non-tech-savvy individuals.
- Customizable: A CMS provides flexibility with themes and plugins, allowing you to build a site that matches your vision.
- SEO-Friendly: Many CMS platforms come with built-in SEO tools or plugins to help you optimize your site for search engines.
- Collaboration Tools: Some CMS platforms allow multiple users to contribute content, making it ideal for teams.
Popular CMS Choices:
- WordPress: By far the most popular CMS, powering over 40% of the web. WordPress offers extensive customization options through themes and plugins. It’s great for blogs, portfolios, and even e-commerce sites. Pros: Highly flexible, massive community support, extensive plugin library. Cons: Requires more maintenance and updates.
- Wix: Known for its beginner-friendly drag-and-drop interface. Wix is perfect for those who want a simple, intuitive experience. Pros: Easy to use, all-in-one platform. Cons: Limited flexibility compared to other platforms.
- Webflow: Ideal for users who want more design freedom without diving deep into coding. Webflow bridges the gap between a visual builder and a coding platform. Pros: Advanced customization, clean code output. Cons: Steeper learning curve for beginners.
- Squarespace: Known for its beautiful, professional templates, making it great for portfolios and small business websites. Pros: Sleek design, all-inclusive plans. Cons: Less flexibility with third-party integrations.
- Shopify: Specifically designed for e-commerce sites, making it easy to sell products online. Pros: Robust e-commerce tools, user-friendly for non-developers. Cons: Transaction fees unless using Shopify Payments.
Choosing the Right CMS for You:
- For Beginners: Wix and Squarespace are great if you need simplicity and a polished look without much hassle.
- For Flexibility and Customization: WordPress is the top choice, especially if you don’t mind learning a bit as you go.
- For Advanced Design Needs: Webflow is perfect for those who want control over design and layout without writing code.
Step-by-Step Guide to Choosing a CMS:
- List Your Needs: Write down what features you need, such as a blog, e-commerce capabilities, or a portfolio section.
- Consider Your Skill Level: If you’re new to website building, choose a CMS with a low learning curve.
- Compare Costs: While some CMS platforms are free, premium themes, plugins, and hosting can add to the cost.
- Try Demos: Many platforms offer free trials or demo versions. Take advantage of these to test their user interfaces and features.
Link to Resources:
8. The Build: Bringing Your Website to Life
Once you’ve chosen your CMS and planned your wireframe, it’s time to build your site section by section. Here’s a detailed guide to help you construct each part of your site with ease.
Setting Up Your CMS:
- Installation: For WordPress, you’ll need to choose a hosting provider and install the CMS. Most providers like Bluehost and SiteGround offer one-click WordPress installation. For platforms like Wix or Squarespace, simply sign up and start building.
- Choosing a Template or Theme: Start with a template that closely matches your vision, then customize it as needed.
- Install Plugins: For WordPress users, plugins like Yoast SEO (for search optimization), Elementor (for drag-and-drop page building), and WooCommerce (for e-commerce) are essentials.
Building Your Website Step-by-Step:
- Homepage: This is your virtual storefront. Include a strong, clear headline, a brief description of what you do, and a prominent call-to-action (CTA) button.
- About Page: Share your story and build trust with visitors. Include photos, milestones, and what makes your brand unique.
- Service or Product Pages: Highlight your offerings with clear descriptions, pricing, and benefits. If applicable, include testimonials or case studies.
- Blog or Content Page: Use this page to share industry knowledge, updates, and insights. Make sure the layout supports readability.
- Contact Page: Include a form for easy communication, along with your email address, phone number, and social media links.
Adding Multimedia:
- Images: Use high-resolution photos to make your site visually appealing. Consider sites like Unsplash or Pexels for free stock photos.
- Videos: Embedding videos can make your content more engaging. Platforms like YouTube and Vimeo provide easy embedding options.
- Interactive Elements: Features like hover effects and sliders can make your site more dynamic.
Testing Your Site:
Before launching, use the preview function in your CMS to ensure all elements are aligned and functional.
9. Launch Time: What Next?
You’ve built your site—congratulations! But launching your site is only the beginning. Here’s what to do to make sure it performs well post-launch.
Setting Up Google Analytics:
Google Analytics is a free tool that helps you monitor website traffic and user behavior. Here’s how to set it up:
- Sign Up: Create a free account on Google Analytics.
- Add Your Website: Enter your site’s details and generate a tracking code.
- Insert the Tracking Code: Copy and paste the code into your site’s header section. Many CMS platforms have plugins or built-in options for this step.
Why Use Google Analytics?
- Understand Your Audience: See where visitors are coming from, what devices they use, and their demographics.
- Track Behavior: Identify which pages are most popular and how long visitors stay on your site.
- Set Goals: Use the Goals feature to track specific actions, like completing a contact form or purchasing a product.
Accessibility: Making Your Site Inclusive:
Accessibility means ensuring that everyone, including users with disabilities, can use your website effectively. Here’s how to optimize for accessibility:
- Use Alt Text: Add descriptive alt text to images so screen readers can interpret them for visually impaired users.
- Keyboard Navigation: Make sure all interactive elements can be accessed via keyboard (e.g., using the Tab key).
- Readable Fonts: Choose fonts that are easy to read and use sufficient color contrast between text and background.
- ARIA Labels: Implement Accessible Rich Internet Applications (ARIA) labels for better screen reader compatibility.
Mobile Optimization: The Key to Modern Success:
With mobile traffic accounting for a significant portion of web usage, optimizing your site for mobile is non-negotiable.
- Responsive Design: Ensure your site automatically adjusts to different screen sizes. Most CMS platforms offer responsive themes or design tools.
- Fast Load Times: Use tools like Google PageSpeed Insights to measure and improve your site’s loading speed. Compress images and enable browser caching for faster performance.
- Simplified Navigation: On smaller screens, a compact and straightforward navigation menu improves user experience.
Link to Accessibility Resources: Visit W3C Web Accessibility Initiative for guidelines and best practices on creating accessible web content.
Final Takeaway: Know What You Want, Keep It Simple
Bringing your first website to life is a journey filled with planning, creativity, and technical steps. By following this article, we hope that you’ll be able to avoid common pitfalls, maintain focus, and create a website that not only looks good but functions seamlessly. Remember, every great website starts as an idea and grows through clear strategy and consistent effort.
Your Next Steps:
- Always welcome feedback and keep refining your site after launch.
- Stay updated with new trends and technologies to keep your website relevant.
- If you want to reach a global audience, consider translating your site for different languages. SiteTran can assist with this seamlessly.
End Note: Building a website is an ongoing process, not just a one-time task. Treat your first launch as Version 1.0 and continue to enhance it as your brand grows. You’ve got this—now go build your masterpiece!